Apple Cider & Caramel Cake

Yesterday all I wanted in my life was cheesecake. I thought about it all day, all night, and I’m pretty sure I dreamt about cheesecake.

OLYMPUS DIGITAL CAMERA

Now you may be thinking to yourself, “Tara is drunk, that picture does not look like cheesecake” AND YOU’D BE RIGHT. Wait…no, not about the drunk part, just that it’s not a cheesecake. But it does involve cheesecake. I promise. Stay with me here.

OLYMPUS DIGITAL CAMERA

So I wake up this morning, the dog jumps in my bed and he’s being all snuggley and making weird dog noises as he does, and I’m scrolling through facebook. I’m about to put down my phone and get up to make breakfast but then…CAKE. Cake catches my eye. An apple cider caramel cake of sorts. I look at it and think to myself “that frigging boiled caramel icing shit never works for me, what the hell”, and I click on the link and read the recipe. I’m in. I’m going to make this cake. I figured I could incorporate my desire for cheesecake into it somehow, and I did.

The recipe is from G Bakes!

You start off looking at it and thinking oh my god there’s so many steps and things to do. But it’s really not that bad. I had all of the components baked/cooked/prepared within in a hour and a half, and waiting for things to cool was what took the longest.

I made a few adjustments to make it what I saw in my head (4 layers and with a liquid cheesecake centre), and it didn’t exactly turn out quite the way I wanted. I know that’s my own fault. I had to go and tinker around with shit and jam some liquid cheesecake into it. It’s ugly, but tastes hella good though and that’s an important thing. It probably could have looked a lot nicer if I had spent a little more time on it. Sometimes I’m not patient enough.

So yeah. If you need a cake for any reason any time soon, you should probably make this one. It’s definitely worth every step. I think all I’ve eaten today is various cake components. That’s healthy, right?

OLYMPUS DIGITAL CAMERA

Adventures in Macs

bdaymacs

I’ve started making more macaron at work lately. It’s downright impossible to do there in the summer when the humidity is upwards of 90% on a daily basis. Those bitches will always deflate before forming a skin to be ready for baking. Jerks.

coffeecoconutmacs

Truth is though, aside from the humidity being a dick, macarons are not hard (I’m totally going to bake a tray without resting soon so that I can find out for sure if that REALLY IS NEEDED because the internet has lied to me before. I know, right? The internet? Lie? Nooooo, never!). I remember when they first became popular here in North America and all the baking bloggers were going batshit insane for them. Perfecting them and doing this and doing that and your eggwhites must be 2 weeks old and sitting on your counter for 3.6 days and you have to crack your oven door open with a spoon to let out humidity and you need to bake them double panned and if you fold the batter too much you’re fucked might as well just throw it in the garbage, and don’t forget to spin around 8 times and chug a litre of milk before baking, that’s the real good luck charm.

rasmacs

The very first time I ever made macaron I had no idea they were supposed to be this tricky, hard, finicky thing. They turned out beautiful…and then I read a blog post about them and how hard they were and I was like “lol bitch please” and went to make them again and WHADDYA KNOW they turned out like shit. They got into my head, those famous internet bakers, and convinced me that these are hard and I shouldn’t be able to make them without wanting to burn my house down.

earlgreyhoneymacs

Eventually I got over my fear of wrinkled, lopsided, and exploded shells and started making them again. I have no idea where the hell I picked up my method to making macarons. I can’t remember if it’s what I learned in school (pretty sure it’s not) or if I found it in a book (which one tho?!) or if I stumbled upon it on the world wide web at some point. Either way, I’ve been slowly adapting it until it almost now produces super hella consistent shells on a regular basis. Swaaayt.

cocoamacs

So ya, kids, I just wanted to share my pictures of shittymacs I’ve made and stolen from my instagram account (follow me for super rad baking pictures for your viewing pleasure, find me under the name “taragone” ~~).

mintmacs

I use the Italian meringue method for my macarons. I’ve hated the french meringue method since the very first day I ever made it in school. I don’t think there’s really a reason why. I just always felt in my heart that it wouldn’t produce as much consistency as Italian does. I like how sturdy and stable the Italian meringue is. I want to jump in a bathtub full of it. I wonder if it would hold me up? Would I float in a bathtub of Italian meringue?! I must know…

pumpkinmacs

Well if you’ve made it this far then I feel the least I can do is at least share my recipe with you. So here you go my patient pretties.

Macarons, Italian meringue style

300g icing sugar
300g almond flour
110g egg whites

120g egg whites

300g granulated sugar
75g water

Preheat your oven to 275F. Prepare an 18″ piping bag with a round tip that’s like..1/2″ in diameter and set aside. 

Pulse the almonds and icing sugar in a food processor until finely ground. Sift and continue grinding the big almond bits that get left behind until there are none left and they all fit through the sifter.

Mix together the icing sugar and almond flour with the 110g of eggwhites until it forms a paste, add any food colouring at this point. Cover and set aside.

Meanwhile, start the 120g of eggwhites whipping slowly in a stand mixer on first speed while the sugar cooks.

Heat the sugar and water in a pot until it reaches 118C. Once it starts to get around 110C you can turn up your mixer speed so the whites are medium stiff before you add the hot sugar. 

Slowly pour the sugar down the side of the mixing bowl while the mixer runs on medium high speed. Then increase to high and let it whip until it’s cooled down. 

Now take a big spatula scoop of the meringue and add it to the almond paste. Fold/mix it in until about 75% combined. Then add the rest of the meringue and fold together until thoroughly combined but not deflated. It should flow like lava, all slow but purposeful. There are countless pictures and video tutorials on the world wide web that show exactly what this should look like. 

Now you can transfer that mixture to a piping bag, not all of it because that would be silly and it won’t fit, and start piping your little babies in even rows onto trays lined with baking mats. Do not use parchment, it absorbs the moisture and gets all wrinkly and your babies will not stay round. Give the pans a good hard tap on the counter to release any air bubbles. 

Let those puppies sit out at room temperature for about 20-30 minutes, until if you gently touch them they do not stick to you. 

I bake my macs one tray at a time because my oven is that uneven. I bake for 10 minutes without opening the door at all and then rotate and bake for 2-5 more minutes, or until if you try to move a mac it is held firmly in place. It’s better to overbake them than underbake them!

Then let them cool before removing them from the mats and filling with whatever you’d like. Ganache, buttercream, caramel, jam…the opportunities are endless. They are best if left to mature in the fridge for at least 24 hours but feel free to eat them all with some tea and feel really fancy right away if need be. I won’t judge. 

Happy baking!

Raspberry Spice Cake

Hello blog, my old friend.

I’ve come to talk with you again.

Because a vision of cake softly creeping.

Left its raspberry seeds while I was sleeping.

And the vision, that was planted in my brain.

No longer remains,

Within the sound, of silence.

BECAUSE I BAKED IT INTO A CAKE, FOOLS.

OLYMPUS DIGITAL CAMERA

Jesus, what has it been, March? So…like 4 months since I’ve posted. UGH. I’m not going to lie to you and say I’m disappointed in myself. It’s just a pain in the butt to upload pictures because I am cheap and have not purchased an SD usb card reader to get my pictures onto my computer. So I have to use my mom’s laptop. Then send them to myself so I can post them from here. Not that you care about any of that, dear reader. You just want the pictures. You just want the recipes. You just want to see this monkey dance!

Well here I am! Dancing away! With cream cheese frosting and raspberry preserves all over my mouth. You like those moves? I know you do.

OLYMPUS DIGITAL CAMERA

I had this vision in my head for the past few days of a little two tier cake, a 6″ and a 4″ stack. I was going to cover it all beautifully smooth with pink buttercream, then attach this beautiful white and gold gumpaste peony that I made to it. But yesterday I went to bake the cake layers and everything fucked up and I was mad and frustrated because WHY DOES BAKING AT HOME ONLY WORK 40% OF THE TIME FOR ME NOW? so I put on my grumpy pants, threw the cake in the garbage, and proceeded to watch It’s Always Sunny for the rest of the day/night. Don’t hate, appreciate.

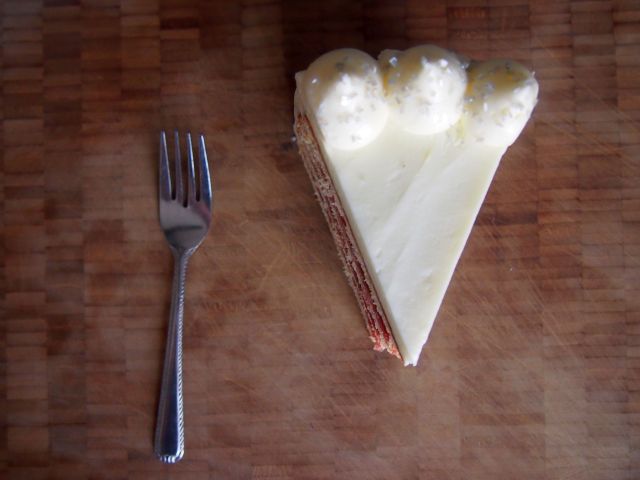
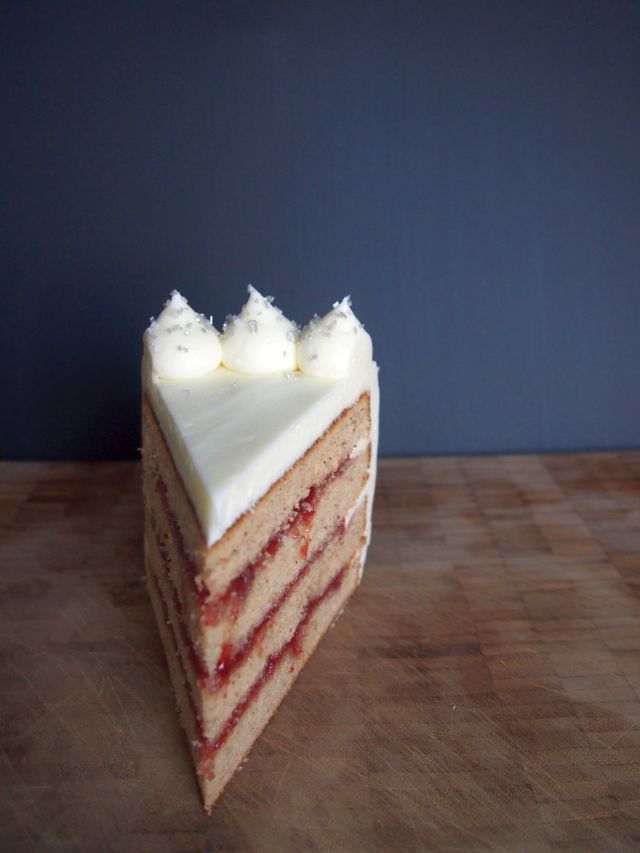
Then today I was like….spice cake. I need spice cake in and around my mouth right now. But I also want fruit. Raspberries. So I baked a spice cake. And layered it with homemade raspberry preserves with some fresh local berries and, obviously, cream cheese frosting.

OLYMPUS DIGITAL CAMERA

Yaaaa she did. Ya she did.

There’s something so equally summer yet winter about this cake. I want it all year round. I want it when it’s 35C out and when it’s -20C out. I want it with a glass of iced raspberry tea and I want it with a chai latte. And I can do that. Because I am an adult.  And because this cake is super easy to make! One bowl for the batter, one pot for the preserves, one bowl for the buttercream. Clean up is a breeze and the results are so worth it.

OLYMPUS DIGITAL CAMERA

Ready to make this one?

Let’s go!

Raspberry Spice Cake

Spice Cake Layers

2 3/4 cups pastry flour
1 cup brown sugar
1 cup white sugar
4 teaspoons baking powder
1/2 teaspoon salt
2 teaspoons ginger
1 teaspoon cinnamon
1/2 teaspoon nutmeg
1/2 teaspoon allspice
1/2 teaspoon clove
1 cup room temperature butter
1 cup of whole milk
3 large eggs
2 teaspoons vanilla extract

Preheat your oven to the usual 350F. Grease and line 2 8″ round cake pans with parchment, set aside.
In the mixing bowl of a stand mixer, use the paddle attachment to combine all of the dry ingredients. Add the butter and mix until a sandy texture develops. Mix together the milk, eggs, and vanilla. Add 1/3 of this mixture to the mixing bowl and beat on medium speed until well combined. Slowly mix in the remaining wet ingredients. Divide into your cake pans and bake for about 30-35 minutes. Allow to completely cool before splitting and filling.

Raspberry Filling

2 pints raspberries
1 tablespoon – 1/4  cup sugar (you’ll have to taste and adjust accordingly. My berries were very sweet on their own so I only needed 1 tablespoon)
Juice of half a lemon

Cook down the raspberries and sugar with the lemon juice until slightly thickened. Set aside until ready to use.

Cream Cheese Frosting

1 8oz pkg COLD cream cheese
1 cup softened butter
4.5 cups icing sugar

In a mixing bowl with the whisk attachment, beat the butter and icing sugar until fluffed and combined. Throw in the cream cheese in chunks, and mix just until everything is smooth. Remember a long time ago when we talked about how over-whipping your cream cheese frosting will lead to a runny un-pipeable frosting? Don’t do that. Don’t make me sad.
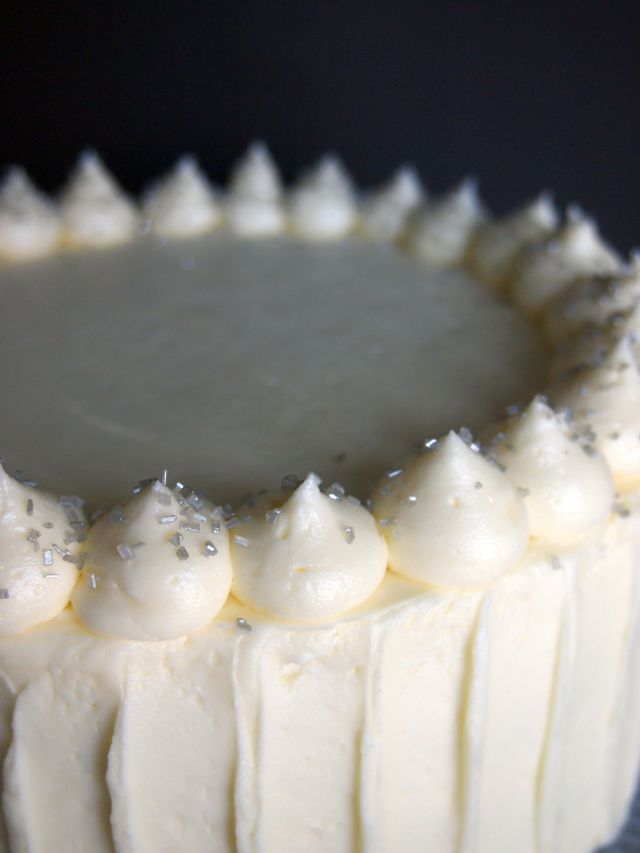
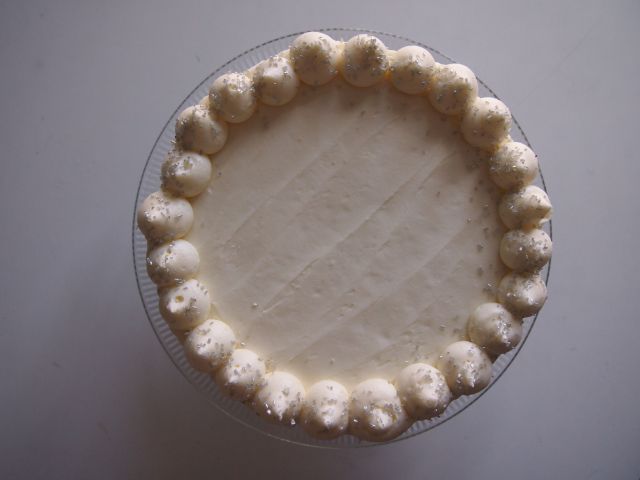
ASSEMBLY!

Level and split the cake layers into 2. Spread each layer with the raspberry preserves, piping a border around the edge with the cream cheese frosting. Then run your offset spatula along the outisde of the cake to crumb coat. Place in the freezer until firm, then pipe the rest of the frosting on to the cake and make it look however you want! Weeweooooo

OLYMPUS DIGITAL CAMERA


Carrot & Apple Muffins

OLYMPUS DIGITAL CAMERA

It’s probably about time that I shared a recipe with you guys that isn’t a cake. Or a cupcake. Or something else completely loaded with sugar and absolutely terrible for you. I mean, the things I make are always good for your soul, right? So that counts for something at least. Here’s something you can feel slightly less guilty about eating for breakfast though.

OLYMPUS DIGITAL CAMERA

Muffins!

I guess they’re basically morning glory muffins. I didn’t put any dried fruit in mine though, because raisins are not my friend and I did not have any currants or anything else of the like. I also just put whatever the hell I had in the crumble, which for me was sunflower seeds, hemp hearts, flax seeds, chia seeds, and coconut.  This recipe is adapted from the Ottolenghi cookbook and is hella tasty and makes you feel like you’re eating something healthy. We like that kind of thing, right? I know I do.

OLYMPUS DIGITAL CAMERA

Grated each individual shred of carrot and apple I did, I swear it


Confession: I absolutely fucking hate grating things by hand. I’ve been so spoiled in my places of employment with awesome food processors and the ever-so-lovely robot coupe that if a recipe calls for something grated and I’m at home, I probably won’t make it. I mean, yes, I have a food processor with the grating attachment and a grater attachment for my kitchen aid, but I’m kind of a lazy person and getting all that shit set up is not worth it for shredding a measly 200g of something.

OOoohhh, ahhhh. CRUMBLE

OOoohhh, ahhhh. CRUMBLE


Today I said, “Tara stop being a dick and grate the fucking carrots and apples by hand like some commoner, because Mom wants these muffins and she’s a special lady”. So I did it. I also may have slightly shredded a few of my fingers. That’s okay. It’s no big.

Carrot & Apple Muffins, with a hella tasty crumble topping.

Makes 12 big muffies. (adapted slightly from Ottolenghi)

300g all-purpose flour
2 teaspoons baking powder
2 teaspoons ground cinnamon
1/2 teaspoon salt
4 eggs
250g sugar
160ml canola or vegetable oil
2 teaspoons vanilla extract
220g grated carrots
200g grated granny smith apples
100g chopped pecans
100g dried currants or yucky raisins
75g shredded coconut

crumble topping

50g soft butter
25g brown sugar
75g rolled oats
15g sunflower seeds
25g pumpkin seeds
15g poppy seeds
50g maple syrup

Combine all crumble ingredients in a bowl and mix with your fingers until it looks like, well, a crumble. Set this bitch aside.

Preheat your oven to 350F. Place 12 paper muffin cups into a muffin pan. Yup, mmmm-hmmm.

In a stand mixer with the whisk attachment, whip the eggs and sugar on medium-high speed until pale and thick. Drizzle in the oil and vanilla and mix until combined. Fold in the grated apple and carrot with a super cool spatula. Mine has a cupcake on it. Add all the dry ingredients and fold those in as well until all happy and combined. Divide the batter between the 12 muffin cups. You might have a bit of extra batter, I totally did. So I baked off 3 little baby muffins separately. Snacks. For testing. Divide the crumble amongst the muf-funs (see what I did there), and gently throw those babies into the oven.

Crumble means it's healthy

Crumble means it’s healthy

Set your timer for about 25 minutes. Rotate them when the timer goes off, and bake them for another 5-10 minutes, or until they are golden brown and you can gently poke them with your finger and it springs back, and they look like this muffin:

OLYMPUS DIGITAL CAMERA

It’s so golden and perfect. You should probably eat it.

OLYMPUS DIGITAL CAMERA

Caramel Nut Tarts

OLYMPUS DIGITAL CAMERA

I made these little beauties at work about a week ago for a dinner and there were 2 left, so I thought I’d take some pikchas for you vultures and share a recipe.

OLYMPUS DIGITAL CAMERA

I wanted to make something like the caramel nut tarts from Bouchon Bakery (and you can find the recipe here), but individual and with a different crust. I put the caramel jam into a buttery, melt-in-your-mouth sablé crust, filled with cashews, hazelnuts, almonds, and pistachios. I kind of wish I had macadamia nuts and not hazelnuts because we all know that I am not the greatest of friends with hazelnuts, but I will admit they’re still growing on me so I LET THEM SLIDE THIS TIME. I got my eye on you, filberts.

Untitled

Sorry for the shitty picture here (screenshot from my instagram, follow me under the name Taragone, what what), but this is what they looked like plated. I made cocoa nib macarons, coconut buttermilk icecream (SO GOOD, I’ll share the recipe another day) and a cocoa nib sablé crumble.

OLYMPUS DIGITAL CAMERA

Ooohhh, aaahhhhh. Omnom tarts.

OLYMPUS DIGITAL CAMERA

At first I was concerned about the tart shells being too thick, but this particular crust is way too delicate to be any thinner without falling apart when handled. It all worked for the better though, and the end result reminded me of…what’s that shit called…pecan caramel millionaires shortbread, or whatever the hell. So good. So perfect. 10/10 do recommend to make. They’re not that hard, and they’re hella good. All of your guests will be impressed and stuff. Ooh la la~~


Lemon+Coconut Chiffon

OLYMPUS DIGITAL CAMERA

This motherfucker right here. Look at it. Just look at it.

This has been my sister’s favourite cake ever since I made it for her birthday some years ago. I remember it being the very first layer cake I ever made that wasn’t chocolate, and the very first chiffon cake I ever made that I didn’t fuck up. It’s a special one to me, kids.

OLYMPUS DIGITAL CAMERA

awwyiss, check out that toasty coconut, bitches

It’s so perfectly soft and fluffy with just enough sturdiness to hold up to the lemon curd. Normally it’s covered in coconut whipped cream but this weekend I forgot to buy cream…so I just made a sweet old-fashioned 7 minute frosting. Which is essentially a swiss meringue. I was going to torch it but then realized I needed the coconut to stick to it. SO NO TOASTED MARSHMALLOW FLAVOUR TODAY, FOLKS. But you totally could do that if you wanted and leave off the toasted coconut. Why the hell not, right?

OLYMPUS DIGITAL CAMERA

typical top shot

I don’t have any pictures of the beautiful insides, as this was brought to a party and every single piece was devoured.

Make this beauty, please.

Lemon Coconut Chiffon Cake

Cake Layers

2 ¼ cup pastry flour, sifted
1 ½ cup sugar
1 cup toasted unsweetened coconut
1 tsp baking powder
1 tsp salt
½ cup canola or vegetable oil
7 large eggs, separated
¾ cup water
1 tsp vanilla extract
1 tsp coconut extract
3 egg whites
1 Tbsp cream of tartar

Lemon Curd

⅓ cup lemon juice (strained)
3 eggs
1 egg yolk
½ cup sugar
1 tablespoon corn starch
½ cup butter
1 tsp lemon zest

Coconut Cream Icing

4 Tbsp icing sugar
2 tsp cornstarch
1 cup whipping cream
½ tsp vanilla
½ tsp coconut extract
1 cup sweet flaked coconut

toasted coconut, for garnish

1. For cake, preheat oven to 325° F. In a large bowl, combine flour, all but 2 tbsp of sugar, coconut, baking powder and salt. Make a well in the centre and add oil, egg yolks, water, vanilla and coconut extract. Beat until smooth with hand mixer. In a stand mixer or with a hand mixer, beat the ten egg whites until frothy. Add cream of tartar and beat until soft peaks form. Beat in 2 Tbsp remaining sugar until stiff peaks form. Gently fold a third egg whites into batter, then fold in remaining two thirds. Pour batter into 2 ungreased springform pans, with parchment on the bottom. Run a knife through batter to burst any air bubbles and bake for 35-45 minutes or until cakes spring back when touched. Let these babies cool.

2. To prepare lemon curd, whisk together sugar and cornstarch, then add the lemon juice, eggs, yolk, and zest in a bowl over a pot of gently simmering water. Whisk until curd becomes thick, pale and creamy, about 10 to 15 minutes. Remove from heat, stir in the butter, and cover with plastic wrap resting directly on curd. Chill until ready to use.

3. To prepare coconut cream, combine icing sugar and cornstarch in a small saucepan and gradually stir in 1/4 cup of the whipping cream. Bring to a boil, stirring constantly, for a few seconds. Scrape into small bowl to cool to room temperature. Add vanilla and coconut extract. Whisk remaining whipping cream to soft peaks. Add cornstarch mixture in a steady stream, whisking constantly, until stiff peaks form. Fold in coconut.

4. Cut cakes into halves. Spread 1/3 of the lemon curd on the bottom layer and place a layer of cake on top. Repeat with remaining curd and cake, ending with cake. Using an offset spatula, spread coconut cream icing generously over entire cake. Garnished with a light sprinkling of toasted coconut.

Pumpkin+Lemon+Nutmeg

IMGP9127

Remember that time I posted a picture of that sweet-ass pumpkin cake I made back in September on all of my social media accounts and said HEY LOOK OUT FOR THIS ON THE BLOG and then I forgot about it and now it’s October and I’m really bad at this whole blogging thing? Cause I sure do! I’m also really good at run on sentences. I could make that one longer if you’d like…no? Okay then, lets just get into the cake I forgot about.

IMGP9115

PUMPKIN CAKE. Filled with lemon curd and slathered with nutmeg buttercream. Perfect with a cup of tea. Or coffee, or whatever else you want to drink. Pumpkin and lemon are a fantastically delicious match. They’re like two unsuspecting best friends. Most people I’ve talked to about this cake has said something along the lines of “pumpkin? and lemon? together? I don’t know about that…” BUT IT WORKS. And why wouldn’t it? The bright citrus flavour really brings out the earthiness of the pumpkin, and that’s something I really like. This cake just tastes…old fashioned. In the best possible way. The cake is spiced with just a touch of cinnamon, only enough to subtly enhance the pumpkin flavour, and the lemon curd is so perfectly bright and happy and delicious which makes the pumpkin happy. The nutmeg buttercream is the perfect blanket to bring the two together. I used to hate nutmeg but I’ve grown to love the absolute shit out of it now. I put nutmeg in everything now. I’m crazy for nutmeg. NUTMEG. NUTMEG IN EVERYTHING.

IMGP9132

Yeaaaah, look at those layers of tasty flavour. MMmm-mmmm good.

Okay so I don’t really remember what recipes I used for these components…but I will try to remember. Real quick.

Pumpkin Lemon Cake with Nutmeg Buttercream

for the cake

2 cups white sugar
1 1/4 cups canola oil
1 tsp vanilla paste
2 cups of pumpkin puree
4 eggs
2 cups all-purpose flour
1 tablespoon baking powder
2 teaspoons baking soda
1/4 teaspoon salt
1 teaspoon cinnamon

Preheat your oven to 350F and line a baking sheet with parchment and spray the edges. Alternatively, line a springform pan with parchment as well as a 6″ round pan and spray the sides. Set this bitch aside. (side note: this little cake in the pictures is a 6″ cake, torted into 3 layers. There was a large 10″ cake as well that I baked into a springform pan and used for something else.)
In a bowl, whip together the eggs and sugar until light and fluffy. Slowly pour in the oil while mixing until it’s all homogenized and happy. Add the vanilla and pumpkin. Sift the dry ingredients together and then dump them in too. Mix until combined and no traces of flour remain.
Now pour this lovely batter into your prepared pan, and bake for..hmm…how long did I bake this for…Probably start with 15 minutes and then check on it. Give it another 5 minutes or so at a time just until the cake is golden brown and springs back when lightly prodded in the centre. You should know the drill by now my friends. Now set this beast aside to cool!

for the lemon curd

8 lemons, zested and juiced
2 cups sugar
1 cup of unsalted butter
6 eggs
2 egg yolks

In a pot, whisk together the sugar, zest, and eggs and yolks. Now add the lemon juice. Cook over medium-high heat, stirring constantly with the whisk. Once the mixture thickens and bubbles, remove from the heat. Stir in the butter and pour into a separate bowl. You can add gelatin at this point if you feel ever so inclined. I would probably put in 2 leaves of bloomed gelatin for this if you want a slightly thicker curd, but the way it is is just fine for this cake.

for the buttercream

1.5 cups of whole milk
3 tablespoons of cornstarch
1.5 cups of sugar
1.5 cups of butter, room temperature
1 tablespoon of nutmeg
1 teaspoon vanilla extract

In a pot, whisk together the sugar and cornstarch. Add the milk and whisk over medium heat until thickened and boiling. Either transfer this to a stand mixer and let it run on medium-low until cooled, or transfer to a bowl and cover directly with plastic wrap until cooled. Once the mixture is cooled, Start whipping it with the butter. It will come together and be all fluffy and buttercream-like. Now add the vanilla and nutmeg.

Now you can assemble your cake! Depending on if you baked it in a sheet pan, or in round pans, you will be layering it however you want. If you baked it in a sheet pan, I recommend trimming off the edges, cutting into 3 equal strips and layering like that. You will need to let the cake sit overnight in the fridge for everything to sort of…meld together so that you can actually cut it without it sliding apart. A freshly layered cake will not slice. At all. It will slide around and make a mess. Don’t make a mess. Don’t be sad. It will work out as long as you let the cake rest, okay? Okay.

Orange Olive Oil Muffins

IMGP8999

Let’s face it. Little bitty baby muffins are cute. So cute in fact that you almost can’t eat-WHOA WHOA WHOA, that’s just crazy talk. Of course you can eat them, and you should. You should eat these ones, because these ones are perfectly orangey, olivey, and seedy. All three things make my mouth happy as well as my soul, and my heart. And when these three things are happy, your life is on a pretty damn good roll wouldn’t you think? Oh I do hope you like these things too.

IMGP8979

Look at that precious little thing, fresh out of the oven. Such a tease!

IMGP8986

Okay now it’s just being mean. How are you supposed to resist these advances?

IMGP8988

Okay no. NO. MUFFIN, NO! God damnit, would you just look at that soft fluffy interior? The orange zest is like…little flecks of something orange I just really want in my mouth. I’m so good with words.

Amazing. Let’s talk recipes.

Orange Olive Oil Muffins
(makes 20 small muffins or 12 large)

120g olive oil
150g sugar
1 egg
zest of 2 oranges
325g flour
2 1/2 t baking powder
1/2 t baking soda
1/4 t salt
250g buttermilk
1/2 cup toasted pumpkin seeds

Preheat your oven to 350F. Get the oil, sugar, egg, and zest in a bowl. Whip those babies up until it’s all creamy and homogeneous. You can use a mixer, or do it by hand. These muffins are easy peasy. Now add in the dry ingredients and the buttermilk and pumpkin seeds and mix just until combined. Wasn’t that easy? Scoop your batter into prepared tins that you can line with papers if you’d like, or just spray them. I sprinkled the tops of mine with a little palm sugar just because, but you don’t have to. Bake them for about 15 minutes until slightly browned and puffy. Eat!

IMGP8964

Ooooooh, yeahhhhh

Breakfast Bar Bonanza

Yo. How do you feel about breakfast? Are you the kind of person who is super busy in the morning and has no time to make breakfast (or rather won’t make time for breakfast, you little rebel. You really should. I love breakfast! It’s my favourite meal of the day. So good. So many options. Okay let’s get back on track here…)

If you feel like you’re too busy to make breakfast, you should at least make these. Wrap them up and chuck them in the freezer, take a few out at a time and you have a quick easy breakfast snack to take on the go.

P6172357

Look at em. Just look at em. Do you want to eat them? Cause you should. They’re awesome, and your mouth should have the pleasure of destroying them.

P6172332

Fruit, whole wheat, oats, almonds, flax, buckwheat groats, puffed quinoa, and whey protein isolate make these babes perfect for your mouth in the morning. Or afternoon. Or midnight. Or any time you want to eat them okay, don’t ask me. Just eat them whenever the hell you want.

I know, I know. You’re probably really confused right now. Probably thinking to yourself, “why the hell is Tara baking and posting about things that are actually fairly decent for your body and not just your soul?!”. Don’t worry your pretty little heads. I may be slowly turning into a hippie in my old age but I will never lose my love for cake. Never. Never ever ever. So chill, okay? Just trust me, and make these.

Raspberry + Blueberry Breakfast Bars
(adapted from Smitten Kitchen)

yields 1 half sheetpan, or 24 bars

Crumble:

1 1/2 cups whole wheat flour
2 cups of rolled oats
3/4 cup brown sugar
3/4 cup almond flour
1/2 cup ground flax seed
1/2 cup ground buckwheat groats
1/2 cup whey protein isolate
1/4 cup chia seeds
1/4 cup hemp hearts
1 teaspoon baking powder
3/4 teaspoon baking soda
1/2 teaspoon salt
1 teaspoon cinnamon
1/4 teaspoon nutmeg
1 cup coconut oil or softened unsalted butter

Preheat your oven to 350F, and line a half sheetpan (18×13) with parchment and spray lightly with oil.

Put everything in to a bowl and mix it all up until crumbly. Feel free to use a food processor if you’re feeling lazy. No judging.

Reserve about 3 cups and press the remaining crumble evenly into the pan. Bake for 10 minutes, then set aside until filling is ready.

Filling:

6 cups berries (I used 4 cups raspberries, 2 cups blueberries)
1/4 cup brown sugar
3 tablespoons lemon juice
zest of 1 lemon
3 tablespoons flour
1 teaspoon cinnamon

Throw everything in a bowl and mix together until evenly coated. Dump over the base, spread out evenly. Cover with the remaining crumble and bake for about 35-40 minutes.

Let cool completely before cutting into bars!

P6172352


Cherry+Rhubarb

Whoa whoa wee wah. Got lazy in writing new posts recently (as usual).

Here’s a super awesome cherry and rhubarb tart I made, with a brown butter crust.

It will take you maybe an hour and a half max to make this super easy and rustic looking little beast, from start to finish. Eat it hot out of the oven with some ice cream, or let it cool and enjoy for breakfast like I did. Fruit is very breakfasty, okay? So it’s totally okay if you eat this for breakfast. I said so.

P5262142

Cherry Rhubarb Tart with Brown Butter Crust

For the crust:

6 tablespoons unsalted butter
3 tablespoons water
1 tablespoon canola oil
1 tablespoon sugar
1/8 tsp salt
1/2 cup whole wheat flour
1/2 cup all purpose flour

Preheat the oven to 350F and set aside a 9″ removable bottom tart pan. Put the butter, water, oil, sugar and salt in a pot over medium heat without stirring. Let this bubble away until the butter begins to brown around the edges. Remove from the heat and dump in the flour, stirring until it all comes together. Press into the pan and bake for about 10-12 minutes until slightly golden.

For the filling:

1/4 cup cornstarch
3 tablespoons water
1/3 cup sugar
4 cups fresh rhubarb sliced 1/2″ thick
1 cup pitted cherries

Place the rhubarb, cherries, and sugar together in a pot and heat over medium until the rhubarb just starts to release its juices. It should still be firm. Dissolve the cornstarch in the water and add to the fruit, stirring constantly until thickened and bubbling. The rhubarb should still be mostly firm.

For the crumbley topping of sorts:

1 cup oats
1/4 cup brown sugar
2 tablespoons coconut oil

Mix everything together until crumbley and whatnot.

Assembly:

Pour the fruit filling into the tart shell, and top with the crumbley mix. Bake at 350F for about 25-30 minutes, until the filling is all bubbley and the crumble is browned.

Eat!

P5262156

This tart didn’t last longer than a day in my house, which I was very disappointed about. I came home from work the next day, thinking on the entire drive home that “oh I’m totally gonna eat some of that fruity deliciousness!” and then IT WAS ALL GONE. One single tear was shed for my loss.

P5262169

I like how the cherries helped the rhubarb stay nice and red instead of green. Yay red fruit! You could do this with raspberries too! Raspberry rhubarb would be good. Even strawberries for a classic! Exclamation marks!

P5262178